![]()
![]()
![]()
![]()
![]()
![]()
![]()
![]()
![]()
![]()
Neuigkeiten und Gerüchte Tactica TAU Miniaturen / Erläuterung Bilder Links
The Tau Commander
 For my Tau Commander, I use a Shas'el in a Monat (lone hunter) configuration,
while I eschew the bodyguards and use a Gun Drone Squadron (Fast Attack choice)
for this purpose instead. I arm my commander with a Fusion Blaster to kill tanks
and a Burst Cannon to match the range and strength of the drones. I also equip
him with a Target Lock, a Hard-Wired Multi-Tracker, and a Hardwired drone
controller with two Gun Drones. When he joins the drone squadron, 10 drones
accompany him. This force structure enhances the commander's ability to survive
by quite a bit. It also allows him to fire at a different target or detach from
the drone squadron and join a Crisis team in an attack. In essence, he can be
flexible and still survive.
For my Tau Commander, I use a Shas'el in a Monat (lone hunter) configuration,
while I eschew the bodyguards and use a Gun Drone Squadron (Fast Attack choice)
for this purpose instead. I arm my commander with a Fusion Blaster to kill tanks
and a Burst Cannon to match the range and strength of the drones. I also equip
him with a Target Lock, a Hard-Wired Multi-Tracker, and a Hardwired drone
controller with two Gun Drones. When he joins the drone squadron, 10 drones
accompany him. This force structure enhances the commander's ability to survive
by quite a bit. It also allows him to fire at a different target or detach from
the drone squadron and join a Crisis team in an attack. In essence, he can be
flexible and still survive.
Another option for the commander is a Shas'o accompanied by two Bodyguards with Shield Generators, Twin-Linked weapons, drones, and all the other goodies. This squad's cost can quickly exceed 300 points. This configuration works well in large battles of strategic importance. However, in tournament lists where the point constraints are tight, it is better to go light on the HQ and get more Fire Warriors. Nevertheless, for a giant, apocalyptic battle in a campaign, this bodyguard configuration is appropriate.
Ethereal Caste
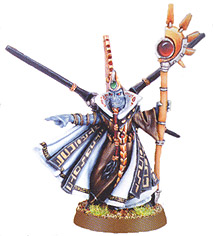 The
Ethereal caste members are majestic, inspiring, and enigmatic. However, their
real value is in holding the Tau firing line. I place my Ethereal with the
center-most squad of Fire Warriors, thus making them fearless. Nearby Tau units
will hold their ground better with the ability to reroll failed morale checks.
However, there are occasions when failing a morale check is desirable. Therefore,
if I cannot use voluntary fallback at the end of the Assault Phase, then I will
reroll a successful morale check. Be careful with teams equipped with jetpacks,
though, as they fall back 3D6". A squad should fall back in order to shoot
at the enemy in the next turn, not to leave the battle! The only useful wargear
for an Ethereal is a Drone Controller and a pair of Gun Drones. Gun Drones are
the best choice since the Ethereal should join a Fire Warrior squad.
The
Ethereal caste members are majestic, inspiring, and enigmatic. However, their
real value is in holding the Tau firing line. I place my Ethereal with the
center-most squad of Fire Warriors, thus making them fearless. Nearby Tau units
will hold their ground better with the ability to reroll failed morale checks.
However, there are occasions when failing a morale check is desirable. Therefore,
if I cannot use voluntary fallback at the end of the Assault Phase, then I will
reroll a successful morale check. Be careful with teams equipped with jetpacks,
though, as they fall back 3D6". A squad should fall back in order to shoot
at the enemy in the next turn, not to leave the battle! The only useful wargear
for an Ethereal is a Drone Controller and a pair of Gun Drones. Gun Drones are
the best choice since the Ethereal should join a Fire Warrior squad.
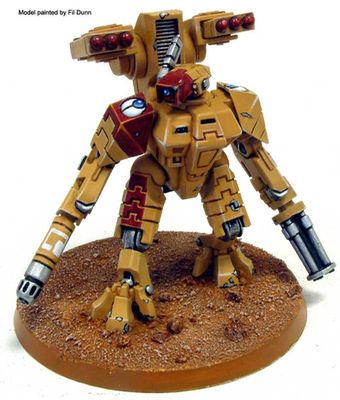
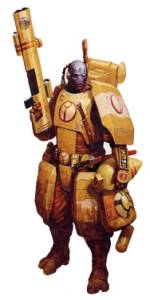
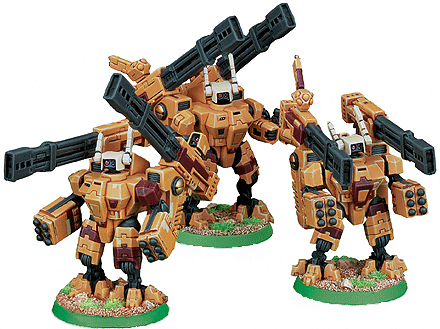
XV-8 Crisis Battlesuit
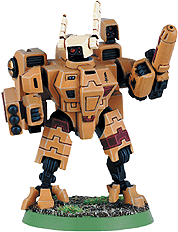 The
XV-8 Crisis team is the signature unit of the Tau army. There is a wide variety
of team configurations that can easily bewilder new players. Before committing
to a configuration with plastic cement, I recommend attaching weapon and sensor
systems with Blu Tac (poster putty works, too) first and practicing with them. I
personally like the Blinding Spear Pattern and the Fire Knife Configuration for
my style of play.
The
XV-8 Crisis team is the signature unit of the Tau army. There is a wide variety
of team configurations that can easily bewilder new players. Before committing
to a configuration with plastic cement, I recommend attaching weapon and sensor
systems with Blu Tac (poster putty works, too) first and practicing with them. I
personally like the Blinding Spear Pattern and the Fire Knife Configuration for
my style of play.
The best use of battlesuits with jetpacks (and their drones) is to move just within range, pepper the enemy with fire, and then jump back outside range, preferably behind cover or friendly troops. This tactic will certainly annoy your opponents– which is good, since I want them to be annoyed! My hope is that they'll waste their time trying to chase the battlesuits down while my Fire Warriors and Heavy Support blow his army away.
Remember that Crisis battlesuits can move normally during the Movement Phase, but must use their jetpacks for their movement during the Assault Phase. Therefore, deploy behind woods, rocks, and hills, and then move into the difficult terrain/cover with normal movement. Be sure that there is less than 6" of woods between the Crisis team and their target/shooting location so that they can shoot. After shooting, just use the jump packs to blast out of and behind the woods. Then the enemy cannot target them. This will infuriate the enemy even more!
XV-15 Stealth Battlesuit
 Besides
the XV-8 Crisis teams, there are the XV-15 Stealth teams. They function in the
same way as Crisis teams. However, they can also Infiltrate, and that can
spell the doom for any enemy Infiltrators. I use them in conjunction with the
Kroot during the Deployment Phase to wedge holes in my opponent's line or to
slow his forward momentum.
Besides
the XV-8 Crisis teams, there are the XV-15 Stealth teams. They function in the
same way as Crisis teams. However, they can also Infiltrate, and that can
spell the doom for any enemy Infiltrators. I use them in conjunction with the
Kroot during the Deployment Phase to wedge holes in my opponent's line or to
slow his forward momentum.
Infiltration is better for Stealth teams than Deep Striking. Save Crisis teams for any Deep Strike tactics. I take large Stealth teams with drones to increase their firepower. Remember that Stealth teams always count as being in cover and use this fact to gain an advantage since the enemy usually charges them in the 1st or 2nd turn.
A Markerlight can be a real asset for the Stealth team leader. If the team remains stationary during the Movement Phase, then the team leader can use the Markerlight. The team may then move using their jetpacks during the Assault Phase. With this tactic, the Stealth team is very useful in delivering a Seeker Missile to just the right spot.
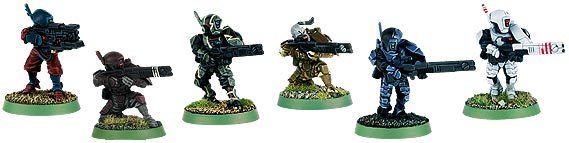
Fire Warriors
 The
Fire Warriors are the de facto staple of the Tau Army. While the Codex
requires one squad in the army, I always fight with (at least) three full squads.
I form firing lines along the front line of my Deployment Zone, two deep and six
abreast with the Pulse Carbine bearers in the front. In a table
quarters-claiming scenario, I form the firing line so it straddles the border
between two table quarters so I can claim one when I need to.
The
Fire Warriors are the de facto staple of the Tau Army. While the Codex
requires one squad in the army, I always fight with (at least) three full squads.
I form firing lines along the front line of my Deployment Zone, two deep and six
abreast with the Pulse Carbine bearers in the front. In a table
quarters-claiming scenario, I form the firing line so it straddles the border
between two table quarters so I can claim one when I need to.
The standard equipment of the Fire Warrior is more than adequate for his job. There are not many options available, mostly because few, if any, are necessary. However, the quandary that faces all commanders is, "What is the optimum ratio of Pulse Carbines to Pulse Rifles?" My opinion is no more than 1:4 of carbines to rifles. The purpose of the Pulse Carbine is to pin an opposing squad in place so that it cannot advance during the next turn and also force it to stay within range. Using this ratio in a 12-strong squad, there are usually enough carbines to guarantee that one enemy is wounded to force a pinning test. Although this does reduce the effective firepower of the squad at long range, I think that the pinning ability is worth the sacrifice. Be warned that it is not always a good idea to fire the carbines; sometimes I want the enemy to run away (especially off-table), so use good judgment before pulling the trigger.
Another option worthy of consideration are Photon Grenades. Fire Warriors are vulnerable to fast moving assault troops like bikers, assault squads with jump packs, and deep-striking Terminators. These troops will engage Fire Warriors to gain an additional Attack for Charging. The Photon Grenades cancel this bonus, and that can mean the difference between just losing the assault (and regrouping later) and being wiped out or driven off the table. Fire Warriors need to hold their ground and bring their formidable firepower to bear on the opponent. A coordinated, well timed assault can destroy your firing line. Do what you can to prevent this from happening.
On the subject of holding the line, a Shas'ui is an excellent upgrade. The extra point of Leadership improves the squad's ability to pass morale checks. I usually have a Shas'ui in each squad armed with a Markerlight. This allows him to aid units with longer-ranged weapons. While on the issue of Markerlights, when I am going to take one for a character, then I equip all my characters with them. They only hit half the time, so when my plan depends on them (i.e., I use many Seeker Missiles), I double up, just in case.
Finally, there are EMP Grenades. These are not generally worth the points – I only use them when fighting an army with many vehicles like an Imperial Guard Armored Company or a Dark Angels Deathwing.
Auxiliaries
 The
Tau list has two other troop choices. The well known (and loved!) Kroot
and the little known Human Auxiliaries. The greatest advantage of the humans is
that they are cheap! They are an excellent screen for either a Broadside Team or
a squad of Fire Warriors. My favorite trick is to arm them with EMP Grenades in
a Kauyon maneuver. Space Marine players cannot resist slamming their tanks into
my firing line. That is when my human traitors charge forward and give the Space
Marines a big shock (ha!). Since they are only armed with Lasguns and cost
next-to-nothing, it is not a big opportunity cost to have them charge across the
battlefield and assault a vehicle. Upgrading one to a Veteran will help them
press forward. I also equip them two with Pulse Rifles and the Veteran with a
Markerlight to beef up the firing line. These
upgrades also help to disguise their real purpose.
The
Tau list has two other troop choices. The well known (and loved!) Kroot
and the little known Human Auxiliaries. The greatest advantage of the humans is
that they are cheap! They are an excellent screen for either a Broadside Team or
a squad of Fire Warriors. My favorite trick is to arm them with EMP Grenades in
a Kauyon maneuver. Space Marine players cannot resist slamming their tanks into
my firing line. That is when my human traitors charge forward and give the Space
Marines a big shock (ha!). Since they are only armed with Lasguns and cost
next-to-nothing, it is not a big opportunity cost to have them charge across the
battlefield and assault a vehicle. Upgrading one to a Veteran will help them
press forward. I also equip them two with Pulse Rifles and the Veteran with a
Markerlight to beef up the firing line. These
upgrades also help to disguise their real purpose.
Kroot
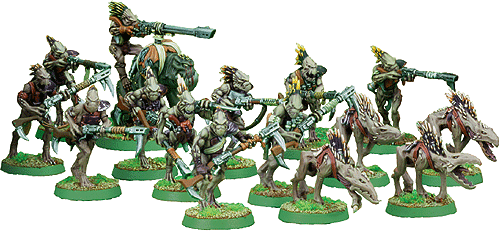 The
Kroot are an army unto themselves. I use them to block assault troops, claim
objectives, and defend flanks. They are extremely useful in jungle fighting with
their field craft and infiltration abilities. I usually avoid taking any Krootox
in order to keep their infiltration ability as an option. I deploy them to
thwart whatever evil plan my opponent has devised in order to charge straight
into my line. This is very effective against Dark Eldar, Tyranids, and Speed
Freeks. While the Hammerheads and Broadsides shoot the transports and "big
ones," the Kroot move to block the hordes and assault the stragglers or
other
The
Kroot are an army unto themselves. I use them to block assault troops, claim
objectives, and defend flanks. They are extremely useful in jungle fighting with
their field craft and infiltration abilities. I usually avoid taking any Krootox
in order to keep their infiltration ability as an option. I deploy them to
thwart whatever evil plan my opponent has devised in order to charge straight
into my line. This is very effective against Dark Eldar, Tyranids, and Speed
Freeks. While the Hammerheads and Broadsides shoot the transports and "big
ones," the Kroot move to block the hordes and assault the stragglers or
other
infiltrators. Add a Shaper in order to get the improved Leadership. Like the Fire Warriors, the Kroot must hold their ground. If my opponent has large squads that I must turn back, then I find Kroot Hounds very useful. With the new assault rules, releasing the hounds on fleeing enemies is a great bonus.
Do not be afraid to fill out the Kroot squads. These carnivores allow me to claim and hold table quarters or overwhelm an opponent. They work especially well when an opponent is using a "horde" army (Orks), as the Kroot will increase the chance of outnumbering an opponent by a wide margin.
Pathfinders
 At
first glance, the Pathfinders hardly seem like a Fast Attack choice. Even though
they may move once before the game starts and deploy with a transport, they are
armed with pseudo-Heavy Weapons and are infantry after all. However, since they
are a Fast Attack choice, they deploy last. They also deploy regardless of the
scenario deployment restrictions. Hence, I get to place my Pathfinders last, in
a position where they will do the most good.
At
first glance, the Pathfinders hardly seem like a Fast Attack choice. Even though
they may move once before the game starts and deploy with a transport, they are
armed with pseudo-Heavy Weapons and are infantry after all. However, since they
are a Fast Attack choice, they deploy last. They also deploy regardless of the
scenario deployment restrictions. Hence, I get to place my Pathfinders last, in
a position where they will do the most good.
Pathfinders
and Seeker Missiles go together like peanut butter and jelly. Since the squad
comes with a Devilfish, I attach a few Seeker Missiles to the vehicle. These are
by far the best upgrades for a Devilfish. For the other options available to
Pathfinders apply the same advice that I gave for Fire Warriors (except for one
that is mentioned below). 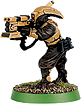
The newest option for Pathfinders are of course the deadly Rail Rifles. This weapon has the same range and pinning effect as a Sniper Rifle. By following another squad's Markerlights, the Rail Rifles will hit on a 2+. I consider these weapons a definite must-have. It gives the Pathfinders some impressive firepower to keep enemies away while the squad lights-up important targets for other Tau. This is where the Target Lock becomes a valuable, albeit extremely risky, option. A word of warning, though: do not use Pathfinders as a cheap substitute for Broadsides!
Gun Drones
 There
is another Fast Attack choice for the Tau, the Gun Drone Squadrons. In my
opinion, these are the best bodyguards a Tau commander could ask for. They have
jetpacks and can keep up with him. I take a squadron of eight drones with my
commander and I include two more with his Drone Controller. Then my opponent has
to kill 10 drones before he can get to my commander! They are separate squads,
so I deploy my commander first and then place the drones in front of him.
There
is another Fast Attack choice for the Tau, the Gun Drone Squadrons. In my
opinion, these are the best bodyguards a Tau commander could ask for. They have
jetpacks and can keep up with him. I take a squadron of eight drones with my
commander and I include two more with his Drone Controller. Then my opponent has
to kill 10 drones before he can get to my commander! They are separate squads,
so I deploy my commander first and then place the drones in front of him.
Gun Drone Squadrons are also good at harassing the enemy since the drones can hover forward while ducking in-and-out, sniping, and slowing down the enemy. Use smaller squadrons (about four to six models) for this job, as they are more expensive than Kroot or Fire Warriors.
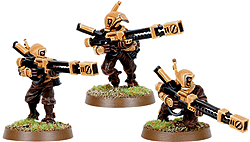
XV-88 Broadside Battlesuit
 No
Tau army would be complete without the Railgun-toting XV-88 Broadside
battlesuits. These heavy hitters form the core of the Tau firing line. Their
standard equipment of a Twin-Linked Railgun and a Smart Missile System is a
perfect fit for their mission: killing vehicles and large beasties. These
targets have a hard time hiding. Hive Tyrants and Land Raiders do not sneak up
on opponents. If they do succeed in hiding, then they will also succeed in
limiting their effectiveness.
No
Tau army would be complete without the Railgun-toting XV-88 Broadside
battlesuits. These heavy hitters form the core of the Tau firing line. Their
standard equipment of a Twin-Linked Railgun and a Smart Missile System is a
perfect fit for their mission: killing vehicles and large beasties. These
targets have a hard time hiding. Hive Tyrants and Land Raiders do not sneak up
on opponents. If they do succeed in hiding, then they will also succeed in
limiting their effectiveness.
To protect these valuable battlesuits, I place a Human Auxiliary or Fire Warrior squad in front of them. This usually causes my opponent to direct his attention on other, more accessible targets.
The obvious sensor system for a Broadside team member is the Target Lock. This system prevents all the potential firepower from being wasted on a single target. Another good option is to upgrade one member to a team leader with Twin-Linked Plasma Rifles, a Multi-Tracker, a Hard-Wired Drone Controller, and two Gun Drones. I find this configuration to be very dangerous at short range,
allowing me to finish off a wounded Carnifex or the remnants of a Terminator squad before it can assault my precious Broadsides.
Hammerhead Gunship
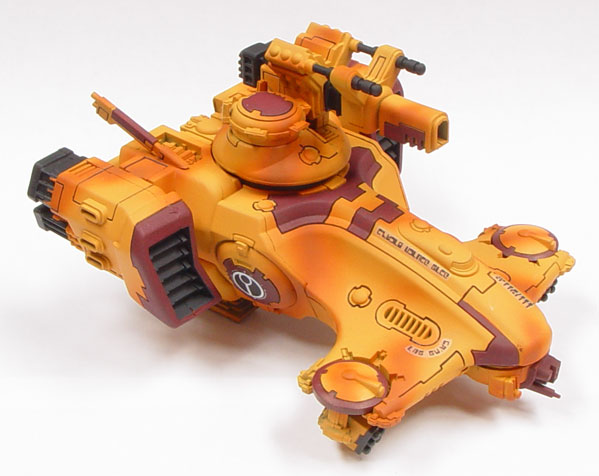 The
Hammerhead Gunship can fly circles around a Broadside team, but it does not pack
as much firepower. Besides being able to move and fire, it is able to kill great
swathes of infantry with the much-feared Submunition Round. I like the Railgun
and Smart Missile System combination for the Hammerhead. The Ion Cannon is
useful against Plague Marines and Eldar Wraithguard, but not much else. By
adding a Multi-Tracker and Target Lock to a Hammerhead with the multifunction
Railgun, I have a truly mobile weapons platform able to engage multiple targets.
The
Hammerhead Gunship can fly circles around a Broadside team, but it does not pack
as much firepower. Besides being able to move and fire, it is able to kill great
swathes of infantry with the much-feared Submunition Round. I like the Railgun
and Smart Missile System combination for the Hammerhead. The Ion Cannon is
useful against Plague Marines and Eldar Wraithguard, but not much else. By
adding a Multi-Tracker and Target Lock to a Hammerhead with the multifunction
Railgun, I have a truly mobile weapons platform able to engage multiple targets.
Now for a quick word on a support system that can make or break a Heavy Support unit: Black Sun Filters. The one thing that can really hurt a Tau army is the dreaded Night Fight scenario special rules. This can allow the enemy to creep in close with impunity and assault! So, if there is any chance that a scenario will use the special Night Fight rules, then be sure to use Black Sun filters. In a
night fight, these filters are better than drones or target locks!
Final Thoughts
Overall, when I use a Tau army, I first go for a high number of models, then I choose fancy weapons and wargear. It is easy to bog down elite Crisis suits with a huge array of weapons and sensors. Do not fall into this trap! Outnumbering an opponent will cause immediate intimidation. Projecting a huge volume of firepower from a single squad will cause him to yell "cheese!" or some other form of profanity, all of which are sure signs of fear!
Keep in mind that it is more difficult for an enemy to target vital Broadsides and Crisis Teams if he cannot kill the piles of the Fire Warriors and Kroot by the end of Turn 6. The new assault rules really benefit the Tau, because it is now more difficult for an enemy unit to destroy a squad in an assault. So, never underestimate the ability of a large Kroot squad during an assault.
During deployment, form a solid firebase and stay out of assault range. Tau like to hunt and shoot. They do not get involved in assaults. The Kroot however are quite good in large numbers, but they are not suicide squads (Human Auxiliaries are much better for that). Do the math. If winning the assault is very likely, then charge! The usual requirement to win a charge is to outnumber an opponent by at least 3:1 with Tau Fire Warriors (including Crisis suits: do not let the high Strength and Attacks fool you) or 2:1 with Kroot. Keep in mind the numbers presented in the Trial Assault Rules when attacking monstrous creatures and Dreadnoughts. If a Dreadnought counts for 10 models, then attack it with 20 Kroot. If there is little or no chance to win, then start moving back. This moment is where the real value of Pulse Carbines comes shining through: it is easy to outrun a pinned opponent.
The Tau army is rewarding both to play and to model. Once, when setting up at a Rogue Trader Tournament, I overheard another player say, "You've got to have guts to come to a tournament with a Tau army!" This is true. There are huge numbers of models to paint. Their tactics are not easy to grasp. It takes erudite skill and tactical acumen to master a Tau force. It is also fun to answer "125" when asked, "How many models are in your army?"